
Were you aware that you can watch the entire “Star Wars: A New Hope” movie right in your terminal? It’s an incredible feat accomplished solely through the creative use of ASCII art.
Now, let’s print a rotating cube, using nothing but asterisks (’*’). This project stresses on role of mathematics in the realm of computer science, particularly in the field of computer graphics.
The Cube
There is however a problem, we are about to print a 3D object on a 2D plane. But let’s not worry about that for now. We will create a 3D cube and and then project it on the plane to make it look like it is 3D.
How do we create a 3D cube?
We are going to use the 3D co-ordinate system and start by assigning co-ordinates to the vertices of the cube.
How do we rotate the cube?
We will choose an angle $\theta$ and use $\sin\theta$ and $cos\theta$ to update the position of the vertices.
Let’s start with the initial setup. We define some variables and parameters:
| |
Let’s understand what we did here:
Here, w and h represent the width and height of the terminal. This determines the size of the cube. out is used to write to the terminal. cube is a list of coordinates representing the vertices of the cube. s and c represent the sine and cosine of a rotation angle. Notice we did not choose any angle $\theta$ because we need to deal with the sine and cosine of the angle of rotation and the angle itself is not of much use. The range of the sine function is [-1, 1]. A negative value of sine will make the cube rotate in the opposite direction. We assigned the value of s 0.1. This is because our cube rotates by a very small angle per frame. The greater the value, the less smooth the rotation becomes, as the points (vertices) undergo more significant position updates. We don’t need $\theta$ to calculate the cosine. Instead, we calculated the value of cosine using the basic trigonometric identity:
$$\sin^{2}\theta + \cos^{2}\theta = 1$$
ym and xm are magnification factors for the Y and X axes, respectively. I will explain the role of ym and xm shortly when we project the cube into a 2D plane.
Rotation
The core of this project is rotating the cube in 3D space. We use the following equations to perform the rotation1
$$x’ = c \cdot x + s \cdot z \\ y’ = y \\ z’ = -s \cdot x + c \cdot z$$
Here, $x$, $y$, and $z$ are the original coordinates, and $x’$, $y’$, and $z’$ are the rotated coordinates. $c$ and $s$ are the cosine and sine values calculated earlier.
Note: If a rectangular $xy$-coordinate system is rotated through an angle $\theta$ to form an $x’y’$-coordinate system, then a point $P (x, y)$ will have coordinates $P (x’, y’)$ in the new system, where $(x, y)$ and $(x’,y’)$ are related by: $$x = x’ \cos\theta − y’ \sin\theta\\ y = x’ \sin\theta + y’ \cos\theta\\ \text{and}\\ x’ = x \cos\theta + y \sin\theta\\ y’ = −x \sin\theta + y \cos\theta$$
In Python, the rotation is implemented as follows:
cube = [(c*x + s*z, y, -s*x + c*z) for x, y, z in cube] # Rotate around the Y-axis
The above code will make the cube rotate around the y-axis but you can also change the axis of rotation by changing the equations.
For example to change the axis of rotation to x-axis we can tweak the equations like this:
cube = [(x, c*y + s*z, -s*y + c*z) for x, y, z in cube] # Rotate around the X-axis
Projection
Now that we have our rotated cube, we need to project it onto the 2D terminal screen. To do this, we use perspective projection. The projection equations are as follows:
$$x_p = \frac{x_m \cdot x}{z + 2}$$
$$y_p = \frac{y_m \cdot y}{z + 2}$$
Where $x_p$ and $y_p$ are the projected 2D coordinates on the terminal screen, and $x_m$ and $y_m$ are the X and Y magnification factors, respectively.
Here, $x_m \cdot x$ performs a scaling operation by multiplying the original x-coordinate ‘$x$’ by the magnification factor for the x-axis ‘$x_m$’. This scaling operation alters the x-coordinate’s magnitude, essentially stretching or compressing the vertices’ positions along the x-axis before the projection.
The (z+2) adjustment in the denominator is used for perspective projection. This modification is employed to create the effect of objects appearing smaller as they move away from the viewer, simulating depth in the rendered cube.
In Python, the projection is implemented as:
proj = [(round(w/2+xm*x/(z+2)), round(h/2+ym*y/(z+2))) for x, y, z in cube]
Rendering the Cube
Finally, we draw the cube on the terminal screen. We iterate through the terminal’s rows and columns and check if the current pixel coordinates are in the proj list. If they are, we draw an asterisk (’*’); otherwise, we leave it empty (’ ‘).
The entire process is wrapped in an animation loop where the cube is rotated and redrawn continuously. A small delay time.sleep(1/15.0) is added to control the animation speed.
| |
This is what we will see if we run the program:
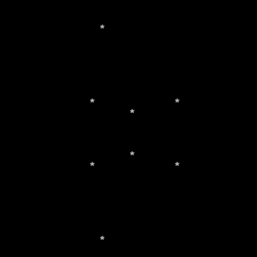
Fig 1. The cube in its current state
Adding Edges
We define a list of all edges.
| |
Each edge will have a start and an end point. The indices within each tuple pair correspond to the indices of the vertices within the cube list. For example, (0, 1) represents an edge connecting the vertices at indices 0 and 1 in the cube list, and so on.
Then we draw the edges.
| |
This code segment operates within a loop iterating through each edge of the cube. edge iterates through each pair of vertices that make up an edge of the cube. start and end represent the projected 2D coordinates (x, y) of the vertices that form the current edge. A loop from i=1 to i=8 (inclusive) is used for interpolation to create smoother lines. This loop divides the line segment between start and end into 8 equal parts. For each value of i, it calculates new intermediate coordinates (x, y) between start and end. This is done by using linear interpolation formula: x = start[0] + i * (end[0] - start[0]) // 10 and y = start[1] + i * (end[1] - start[1]) // 10. This formula divides the line segment into 10 equal parts (// 10) and calculates intermediate points. The newly calculated coordinates (x, y) are appended to the proj list. This expands proj by adding more points that lie along the edges, resulting in a smoother representation of the cube when it’s projected onto the 2D screen.
Upon running the code now we will see the cube along with its edges.

Fig 2. The final cube
The Complete Code
Here is the final code. I recommend you experiment with it by changing the values in equations and variable initialization to better understand the function of each of them.
| |